Going bananas…not really.

bananas

(Photo credit: Fernando Stankuns)

If you recall a couple week’s ago I mentioned having a baking disaster involving a banana bread.  Yeah, I was pretty pissed off…however I decided to give my bananas a second chance, this time in the form of banana cupcakes (cupcakes never let me down!).

Banana cupcakes

I didn’t have any banana cupcake recipes in my good ole recipe box so I did a little searching online.  I finally settled on making Gina’s Banana Cupcakes which I found on the Food Network’s website and boy, I’m so glad I chose to go with this one.  This cupcake was not only very flavorful but it was moist as well…I also like that it makes only 12 cupcakes and not 24, in my little household of three, 12 cupcakes is more manageable than 24.

Aren't they lovely?

Aren’t they lovely?

I followed the cupcake recipe to a tee with the exception of omitting the walnuts. Don’t get me wrong, I love walnuts but my little household of three also happen to be picky eaters.  I opted to use my own cream cheese frosting instead of the molasses frosting suggested on the website.  Here is the recipe I used:

Banana Cupcake:

1 c all-purpose flour

1/2 tsp baking powder

1/2 tsp baking soda

1/4 tsp salt

1 stick (4 oz) unsalted butter, softened

1/2 c granulated sugar

1/4 c sour cream

1 and 1/2 tsp vanilla extract

2 large eggs

2 large ripe bananas, peeled and mashed

-Recipe adapted from Gina’s Banana Cupcakes

Cinnamon Cream Cheese Frosting:

8 oz cream cheese, softened

4 tbsp. unsalted butter, softened

1 and 1/2 – 2 c confectioners sugar (adjust to your level of sweetness and/or how stiff you need the frosting to be)

1/2 tsp vanilla extract

1/2 tsp cinnamon (I suggest you start with 1/4 tsp first, I prefer a more cinnamon-y taste)

Cupcake directions:

  1. Preheat your oven to 350F.  Line a 12-cup muffin tin with liners.
  2. In a bowl, combine the first 4 ingredients: flour, baking powder, baking soda and salt then set aside.
  3. In a larger bowl, cream the butter and sugar.  Add the sour cream and vanilla extract.  Add the eggs one at a time and gently beat in (I used the slowest setting on my hand mixer).  Add the flour mixture and mix until fully combined (I did this part by hand to avoid over mixing).  Lastly, add the mashed bananas.
  4. Fill liners 3/4 of the way with batter and bake for 18-20 minutes until cupcakes are golden brown and a toothpick inserted comes out clean.  Remove cupcakes from the oven and let cool.

Frosting directions:

  1. Beat cream cheese and butter with electric mixer.  Add vanilla extract and cinnamon, mix until combined.  Slowly incorporate the confectioners sugar and beat for a few minutes.  Generously frost your cupcakes and enjoy!
Banana cupcake

(I have to work on my lighting)

I am definitely adding this recipe to my collection because it is truly one delicious cupcake.

So moist!

So moist!Baked goods 025

I have bananas going bad weekly!

Does anyone have a great banana recipe they’d like to share?  

Easter…already?!

I don’t know about all of you but it feels like Easter came way too quick this year!  I’m so not ready for it and Easter happens to be one of my favorite holidays (Halloween and Christmas are the others), mainly because I love all things rabbit…well, except rabbit stew.

Truth be told, I barely decorated my home for Easter this year!

My love for rabbits started when I was a little girl, my Dad bought me a stuffed animal that was a rabbit, I loved that thing so much; when I was a teenager, I gave the okay to my Mom to throw it out, worst mistake ever!  (sorry bunny)

My Dad also bought me two live rabbits when I was young, they were white and fluffy with hot pink eyes, they pooped everywhere but I adored them so much.   Ever since then I’ve always been into infatuated with rabbits.

I’ve done a little Easter baking this past week and I hope to share my pictures with you in the next couple of days.  In the meantime, here are some other Easter recipes that I am crazy about:

  1. I’ve really been into making sugar cookies lately and I’m trying to master working with royal icing, its nerve-wracking for me!  Anyhoo, I am particularly loving these super cute bunny cookies made by Bridget over at bakeat350.blogspot.com!  Aren’t they lovely?
  2. These cake pops by Bakerella are amazing.  The ears are jordan almonds for crying out loud and check out the other details!  I hope to master cake pops like her one day.  Love them!Easter Bunny Cake Pop
  3. I am obsessed with this cake featured on The Cake Blog…the blue color is gorgeous, the contrast of the speckling is beautiful and the eggs on top are, well, the icing on the cake!  Obsessed, I tell you…this is on my “baking to-do” list (even if its after Easter).
    DIY Speckled Robin's Egg Cake  |  TheCakeBlog.com
  4. I adore these little cupcakes I found on Purple Chocolat Home!  This is something my daughter would love to help me with…too cute.
  5. If there is no time to crank out intricate cookies, cakes and cupcakes, there is always time to make rice krispy treats and who doesn’t love a soft, chewy, marshmallowy rice krispy treat!?  Well, my daughter for one but that’s another story.  I, on the other hand, looove rice krispy treats and I actually got to make some this past weekend for my niece’s baby shower, who also happens to love them (will post pics soon).  I really like the way Glorious Treats dressed hers up, this would look really nice on a Spring dessert table or even for a girls birthday party.
  6. And if in case you are looking for something savory instead of sweet, check out these cheese carrots!  This is a very neat idea, they look so real too.
    Fun Cheese Carrots

I hope you’ve enjoyed these recipes as much as I have.  

What are you cooking up for Easter?  I’d love to know.

Hipster Bunnies Have Some New Shades 2

Monday Musings….

Happy Monday!  I hope everyone had a great weekend.  Here are a few things that are on my mind today…

  1. I know I haven’t posted in over a week but I’ve been in a little bit of a baking rut.  First it started with my camera, not being able to upload any pictures to my computer really bummed me out.  I finally figured that out so I was ready to get my baking on but then a baking disaster occurred .  Last week I was in the mood for something sweet with rum as an ingredient, which is strange because I am not a rum drinker!  Anyhoo, I had a few bananas that were past the pretty stage (you know what I’m talking about) and I really hate throwing food out so I decided to make a banana bread with a little rum twist to it.  I had the hubby buy me some dark rum and I was all set…I get all my ingredients out, turn on the radio and off I went into my own little baking world.  I’m not sure if it was all the dancing I was doing or what but somehow I managed to use baking powder instead of baking soda (disaster #1).  And to make matters worse, I made a bad judgement call and took out the banana bread a little too early (disaster #2).  I let it cool for several hours before eagerly slicing into it only to discover the middle was not cooked all the way…I was so upset….so much for not throwing food out.  That really put me into a funk and I hung up my apron for a few days.  Does anyone have any baking disasters they’d like to share??
  2. Speaking of cameras, I’ve always been into photography and I’ve purchased some pretty nice cameras throughout the years but I’ve only taken pictures in the “auto” setting.  It wasn’t until recently that I’ve started reading up on the other settings my camera has to offer.  Aperture priority….what the heck is that?!  During my brief baking hiatus I kept myself busy by reading countless websites and blogs regarding photography and camera settings.  All of them were quite helpful but there was one blog  in particular who really broke it down in plain English and it finally started making sense to me.  I’m currently shooting with a Canon PowerShot S3 IS which I bought in 2006 (maybe its time for an upgrade) and this is the first time that I’ve taken pictures not using the “auto” setting (see practice shot below, aperture was set at 2.7 if I remember correctly).  I’m so excited to be learning more about photography and how to take decent pictures!003
  3. This picture brings me into my next thought – Nielsen Massey Pure Vanilla Extract!  My vanilla has finally gotten an upgrade, I’ve always used pure vanilla extract from the supermarket but I’ve been reading so much about this good quality vanilla that I decided to just take the plunge already…I haven’t used it yet but I can’t wait to try it!
  4. Lastly, I enrolled in a Wilton decorating course…I had to take course 1 as a prerequisite for the fondant and gum paste course I really want to take.  This past weekend we had to bring in a cake (I used box mix, don’t tell anyone) and decorate it with some of the techniques the instructor has shown us thus far.  I’ll be honest, a lot of what we are covering I learned in my pastry arts class in high school but I’m still picking up a couple new tricks here and there which is always nice.  However I’m really anxious to start learning about fondant next month!

Well, I went on and on…I think that is enough for one day!  I’ll leave you with this cute little egg holder I found at Target over the weekend…isn’t he adorable?

006

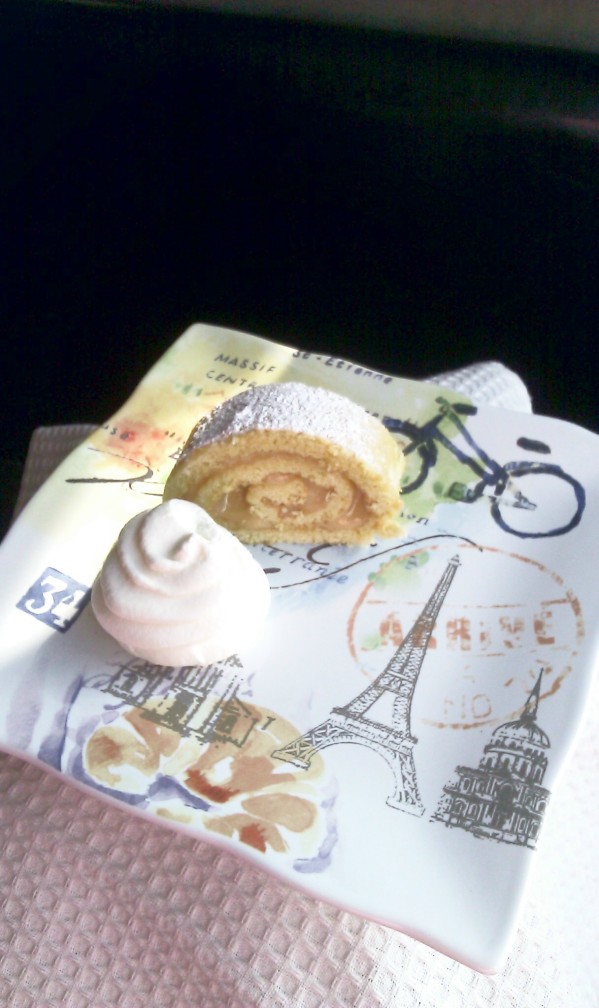
Spongecake Roll with Dulce de Leche Filling

spongecake

Hi all!  Today I decided to make a  sponge cake (jelly roll style) with a dulce de leche filling.  Its been a while since I’ve made a jelly roll, high school to be exact!  We used to make them in our baking class all the time so I decided for old times sake I would make one today.  I used a jelly roll recipe from The Joy of Baking website but made some very minor changes.

Instead of the whipped cream filling, I decided to try dulce de leche instead.  For those that are not familiar with dulce de leche, it is basically a milk caramel.  The name dulce de leche literally translates to “candy of milk” and it is very popular in South America.  The traditional method of making dulce de leche consist of slowly cooking milk and sugar and constantly stirring it until it thickens.  Or more commonly, one can boil a can of sweetened condensed milk for a few hours thus resulting in dulce de leche.  This method absolutely terrifies me…nothing about putting an unopened can in a pot of hot water sounds okay to me (I’m a big chicken as you can probably tell but if you’ve made dulce de leche on the stove top, please let me know your experience).  I’m sure people do it this way all the time and its fine but I know myself all too well, I will walk away from the pot, start doing something else and forget to check the water level in the pot…and before you know it, there’s dulce the leche covering every inch of my kitchen…um, no thanks!

Instead I took the safe route by pouring the contents of one can of sweetened condensed milk into a baking dish, covered it with foil and baked it in a water bath at 425 degrees F for about an hour and twenty minutes.  I checked on it after an hour but it looked too light in color for me so I left it in the oven for an additional twenty minutes which resulted in a nice caramel color.  I let this cool on the counter and then whisked it to smooth out.  Since I wasn’t going to use it right away, I covered it and stuck it in the fridge until I needed it.  When ready to use, simply bring the dulce de leche to room temperature by placing in a warm water bath or microwave for a few seconds.

Sponge Cake Ingredient:

4 large eggs

1 large egg yolk

1/3 cup sifted cake flour

3 tablespoons cornstarch

1/2 cup plus 1 tablespoon granulated white sugar (divided)

2 teaspoons pure vanilla extract

Filling:

1 (14 ounce) can of sweetened condensed milk; bake in a water bath for approximately one and a half hours, check after an hour for deep caramel color.   (Note:  make filling first as it takes a while to bake and it needs to cool)

Directions: 

  1. Preheat oven to 450 degrees F.  Butter or spray a 15 ½ x 10 ½ jelly roll pan, line with parchment paper, and then spray the parchment paper with a non-stick vegetable/flour spray or butter and flour the parchment paper in lieu of the spray.
  2. Separate two of the eggs, placing the yolks in one bowl and the whites in another bowl.  To the bowl containing the yolks, add the additional yolk and the two remaining eggs.  Allow the eggs to come to room temperature (about 30 minutes).  Meanwhile, in a small bowl whisk the flour with the cornstarch and set aside.
  3. After the eggs have reached room temperature, place the egg yolks and whole eggs, along with 1/2 cup of the sugar, in your stand mixer fitted with the paddle attachment.  Beat on high-speed for five minutes until its thick and pale yellow.  Beat in the vanilla extract.  Sift half the flour mixture into the beaten eggs and fold in gently, just until the flour is incorporated.  Sift the remaining flour mixture into the batter and gently fold in.
  4. In a clean bowl, with the whisk attachment beat the egg whites until foamy.  Add the cream of tartar and continue beating until soft peaks form.  Add the remaining one tablespoon of sugar and beat until stiff peaks form.  Fold a little of the egg whites into the batter to lighten it, and then add the rest of the whites (gently folding in).
  5. Pour the batter into the prepared pan, spreading evenly.  Bake for about 6 minutes or until golden brown, you should be able to see the cake spring back when lightly pressed.  Dust a clean kitchen towel with confectioner’s sugar and invert the cake onto the towel.  Remove the parchment paper, sprinkle with confectioner’s sugar, and roll up the cake, along with the towel. Completely cool on a wire rack.
  6. Once cooled, unroll the sponge cake and spread with the cooled dulce de leche.  Re-roll, wrap well in plastic and chill in the refrigerator for several hours.  Just before serving, dust the roll with a little confectioner’s sugar.  Serves approx. 6-8 people (depending how you slice it)

Sponge cake recipe Adapted from The Joy of Baking

Note:  I used a smaller jelly roll pan because I have a small oven.  However, this recipe filled the pan perfectly, although I felt the cake was a tad bit dense…so I’m guessing with the larger pan the cake would’ve been lighter since it would be thinner.

Rant:  I took a gazillion pictures on my Canon and sadly I’m unable to transfer the pictures to my computer at this time.  Hopefully I will figure out what the issue is and get it resolved soon!  Luckily I snapped these two pictures with my phone so I’m able to share a visual with you, although the quality isn’t great.

Bon appetit!

spongecake2

Hola!

This is my first post and I just wanted to say HI (is anyone out there?)…I’m new to the blogging world and have so much to learn but I’m excited to be doing so.

I was hoping to have a more exciting post than this but the batteries in my camera decided to die today (grrr)…hopefully in the next couple days I can post my first sugary concoction.  I have dulce de leche on my mind…need I say more?